Tuesday, December 29, 2009

Configure the Akai MPK25 to work with Sonar 8.5

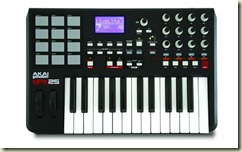
I finally got the MPK25 working perfectly with Sonar last night.  I have to say, it’s been just a tad bit frustrating getting Sonar to recognize the MPK25’s surface.   

There were a few things that complicated the matters.  Knowing what not to do, would have saved me a lot of time and frustration.  Let’s start with the MPK25 and then we will move on to configuring Sonar.

Setting up the MPK25: MPK25

Plug the MPK25 to a free USB port on your PC.  This will power the MPK25 and enable the MIDI ports.

Common sense would tell you to select the “Sonar” preset in the MPK25.  Do not use this preset.  For some reason, the preset doesn’t use the common midi channels for the knobs.  Instead of using the “Sonar” preset, use preset 16 (GM). 

Next, set the MPK25 to “external” time synch.  You do this from the Global Settings menu.  This will enable the Note Repeat and Arpeggiator function to synch with your Sonar project. Remember to save your settings so you don’t have to do this every time you power on your MPK25.

Your MPK25 is ready to go.

Setting up Sonar 8.5:

First, make sure you have the proper MIDI channels selected.  We need to make sure that the MPK25 and Sonar are both communicating on the same channel.  Open the MIDI Devices window by clicking Options/MIDI Devices.  Put a check mark next to “Akai MPK25” under the Inputs and Outputs sections.  Click OK to save. 

image

Next, open the Controllers/Surfaces window under Options.  Add a new controller.  Select “ACT MIDI Controller – 1”.  Select “Akai MPK25” for Input and OutPut.  Check the boxes like in the illustration below. Close the window once you are finished making the changes.

image

The final step is to map the MPK25 knobs to events you want to control in Sonar.  In this example, we are going to configure Volume and Pan for the first 8 Sonar tracks.  We will designate Bank A on the MPK25 to Volume, and Bank B to Pan.  We will configure this from the Controllers/Surface Properties window.  You open it by clicking the icon on the menu bar (highlighted in yellow in the illustration below).

 image

Select the Option tab in the Controllers/Surface Properties window.  In the Rotaries section: Select Bank 1 for Bank. Select Vol for Parameter.  Leave Capture Mode blank.  Uncheck “Exclude this bank from ACT”.  The MPK25 doesn’t have sliders so we need to exclude this bank from ACT.  We need to configure the Transport buttons to control Play, Stop, Forward, Rewind, and Record.  Under the Buttons section: Select Bank 3 for Bank. You will need to configure the action for Button 1 through Button 5.  Make sure to deselect “Exclude this bank from ACT” for each button you configure. Finally, make sure that all the boxes highlighted in yellow (below) are NOT checked.

image

The final step is to map the knobs to each track.  You do this under the Controllers tab.  Click the Controllers tab to start programming the knobs.  In this menu you can program up to 8 knobs.  These are labeled Rotary 1 through Rotary 8.  First you need to select the proper Bank on the MPK25.  Make sure you are on Bank A.  Then select Bank 1 under the “Rotary” row in Sonar. Next click on the green section of Rotary 1 and rotate the knob you want this to map to on the MPK25. (Note: Rotary 1 will control track 1.  Rotary 2 will control Track 2. etc…) Repeat this through Rotary 8. 

image

Next switch to Bank B on the MPK25.  Select Bank 2 on the “Rotary” row in Sonar.  Click on the green section in Rotary 1 to enter learn mode.  Rotate the knob on the MPK25 to learn it. Repeat through Rotary 8. 

We will not program the “Slider” and “Shift + B1” rows in this tutorial.  Move on to the Buttons row to program the Transport buttons.  Click on the green section in Button 1 to enter learn mode.  Press the rewind button on the MPK25. Repeat through Button 5.  Button 5 should map to the Record button on the MPK25.

Once you finish programming the buttons, you simply need to save your settings as a Preset. Type MPK25 in the Preset field and click the Disc icon to save your settings.  You are now ready to start using your MPK25 with Sonar!  Enjoy :)

One last thing to note… You may be wondering why your arpeggiator and note repeat functions aren’t working.  This is because you have to enable MIDI time synch for your Sonar project.  This is not a global setting in Sonar.  Which means that you have to enable it for every project you start.  I recommend creating a template so that you don’t have to enable this every time. 

To enable MIDI time synch, start a project and open the Project Options window by clicking on Options\Projects...

Click on the Sync tab and select the boxes as shown below. 

image

Next click the Clock tab and select the boxes as shown below.

 image

Click OK to save and start having fun!
Wednesday, December 23, 2009

Automate Your Job Search

    I'd like to share a few tips that I hope will increase your chances of landing that dream job. I applied this technique the last time I was in the market for a new job and it proved to be successful. I have since shared this with friends and they have had similar results.

    The idea behind this concept is to get your resume and application submitted as soon as the job is posted. The first applications that make it through the door will have a greater chance of getting reviewed. You don't want your app or resume to get lost in the shuffle; which is why getting yours submitted first is so important.

    With this in mind, it is very important to know of the posting before other candidates. This is where RSS technology can help you get the edge. By leveraging RSS and Email, you will learn about new jobs as soon as they become available.

    Before I get into the details as to how this works, you need to make sure you have an updated resume ready to go. Also, make sure you have all your job history and references information ready. A lot of online applications will require this. I saved all this information in Microsoft OneNote so I can easily copy and paste it into online apps.

    Setting up an RSS News Feed

    OK. Let's get into the details on how to get this configured. In my example, I will be using Internet Explorer 7 and Outlook 2007. You can do this with other browsers, but you will need to figure it out on your own. ;)

    Step 1.

    The first step is to visit the sites that host the job postings.

    My personal favorites are:

    www.simplyhired.com

    www.indeed.com

    www.dice.com

    In my example, I will use www.simplyhired.com

    Step 2.

    Once you get to the site, you are presented with a simple to use search engine. Let's go ahead and search for a Desktop Technician position in Portland, OR.

    clip_image001

    Click the Search Jobs button to review the report of all job postings that match your keywords.

    Step 3.

    Now that we have created a job search report, we will need to save it as and RSS feed.

    Locate and click the orange RSS feed icon in Internet Explorer.

    image

    Once you click the RSS feed icon you will be presented with the RSS feed. Click on the "Subscribe to this feed" link to save the report as an RSS feed.

    image

    A window will open prompting you to name and save your new feed. Give it a descriptive name so that you can easily locate it later. I will call it "Desktop Support - Simply Hired". Click on the Subscribe button to save the feed.

    clip_image004

    Step 4.

    Now that we have created our RSS feed lets go ahead and use it. The feed can be located in Outlook 2007 and in Internet Explorer. I will show you how to look up the feed in both places.

    In Internet Explorer click on the Favorites button and select Feeds.

    image

    You will see your feed in the list. Click on it to display your RSS Feed.

    Here's a quick view of where to find your RSS Feeds in Outlook 2007.

    image

    Important Information Regarding RSS Feeds.

    There are a few things you need to know about feeds.

    • By default, feeds only update once a day. You can configure your feeds to update every few minutes. I will show you how to change the update schedule in the section below.
    • The feed report is only as good as your keywords. I recommend that you create multiple RSS feeds for each job site to expand the scope of your search. In our example we used the keywords "Desktop Support". It would be beneficial to create other reports with the following keywords: Desktop Technician, Helpdesk, Desktop Engineer, PC Technician, PC Specialist, etc…

    How to change the update schedule

    This can best be configured from within Internet Explorer. Open Internet Explorer and open the RSS feed you wish to change the refresh interval on.

    Once your feed is open, select the "View feed properties" link to open the Feed properties window.

    image

    I recommend a setting of 30 minutes. Once you change the update schedule, remember to click OK to save your changes.

    Leave me some feedback and let me know if this helped!

Thursday, December 10, 2009

Zune HD and The Evolution of Music Players

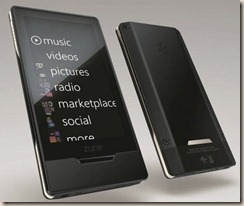
Zune HD Wow.  That pretty much sums up my review.  After having it for a couple of weeks and getting to know its personality, I understand what Microsoft was aiming to accomplish with this device.  They aren’t looking to be an all in one device like the iPhone or iPod Touch.  They put their efforts in enhancing the music experience.  They took the next step in the evolution of the personal music player.

Music players have been evolving since the introduction of the first portable radio.  When tape players were introduced, it gave us the power to be the DJ and play our own music selection.  It had its issues though.  We all remember how painful it was to replay the song that just played.  The CD player solved that by allowing us to quickly select the song we wanted to play.  However, it didn’t give us the ability to carry a larger selection of music.  CD Players also introduced CD skipping as a nagging issue.  I once had a Sony Walkman that skipped every time I took a step.  I couldn’t walk and listen to music.  Which I thought was strange since the player was called a “walkman”.  Portable MP3 enabled us to hold far more music and solved the issue of CD skipping. 

The first MP3 player was the MPMAN by a Korean company called SaeHan Information Systems.  It was introduced back in 1998 and was followed shortly after by the Diamond Rio.  They were clunky, had limited storage (32 to 64 MB) and had terrible user interfaces.  The limited storage meant that you had a trade off: sacrifice music quality for music quantity.  Creative Labs set out to solve that problem by increasing the amount of storage capacity and including high end audio components in their players.  I purchased the Creative Labs 40 GB Nomad Jukebox in 2001.  The Nomad was loaded with features.  It had a USB and Firewire interface.  The firewire interface was useful when transferring large amounts of data.  It had an external hard drive mode and didn’t require special software on your PC to use it.  This thing had 1 front channel stereo output, 1 rear channel stereo output, 1 SPDIF input optical plug, 1 audio line-in, and an infrared remote sensor!  And yes, all of the jacks were gold plated.  It also played all of the music file types of the time; which included MP3, WMA, WAV, AAC, SDMI.  However, it introduced its own set of issues that allowed Apple (a newcomer) to step into its space and take all of its market share.  The Nomad had a terrible user interface.  The software that was included with the Nomad player was horrendous.  Creative Labs failed to realize that people needed a way to organize their large music libraries.  MP3 players had introduced an even larger issue that threatened to destroy the music industry.  People realized that MP3 files were relatively small and could be easily shared.  There was no way to prevent a user from sending a song or an album to another user.  Why buy it when your friend is offering to give it to you? 

Apple made a list of all the issues and set out on a mission to solve them.  Their answer to all this was iTunes and iPod.  Apple’s iTunes gave us a better way of organizing our large music libraries and a means of purchasing music through a legitimate source.  They made it convenient for us to stuff our players full of music without the guilt. The iPod player made improvements on the user interface and were no longer bulky devices.  Needless to say these players were a big hit.  Since then, Creative Labs and other companies introduced MP4 players: video was now portable too.  These players were dubbed media players.  Unfortunately, they failed to make notable improvements on the user interfaces and user experience.  Apple followed and introduced their iPod player that supported video and kept a firm hold on the market share.  We now have a great user interface on our iPod players.  They have plenty of storage capacity, the music sounds great, the video looks great, and iTunes is a great resource for media.  Is that it?  What’s next? Enter Zune HD.

This is where things start to get really interesting.  Zune HD offers all of the above, but takes it one step further.  First off, you don’t need a wire to synch your music.  The player will do this wirelessly.  You also don’t need to purchase your music from the PC.  You can do it from the player.  But wait, it gets better.  Let’s say you are listening to your favorite artist perform one of his hit singles.  Zune HD enables you to read his music Bio, explore other albums, look up pictures, and even explore other artists that are similar in style.  They do this through the slickest interface I’ve ever had the pleasure of interacting with.  My music experience has been magically enhanced.  I had no idea Puff Daddy was involved in Usher’s first album.  I also had no idea Sade had so many albums.  I’m buying all of them!  It seems that ever since MP3s have been part of my life, I’ve been so focused on increasing my library that most of the music I own isn’t really music I enjoy.  With Zune HD, I am able to explore and discover music that I truly enjoy and feel excited about.  That’s the next level and Microsoft just took me there!  I wasn’t too impressed with the direction Apple was taking with the iPod.  Sure the interface is cool.  And yes, it has a lot of apps.  Honestly, the fake lightsaber was cool for about 10 mins.  I haven’t been too impressed with the games on it either.  That’s what my PSP and Nintendo DS is for.  One more gripe, I really don’t need a camera on my music player. Thanks but no thanks.   

Thank you Microsoft for keeping it real.  The Zune HD “keeps it real” like 112 and Biggie.